Build a private chain with one node
Neo-CLI supports generating blocks without consensus nodes, which means you can set up a private chain with one node. To simplify the process, you can directly download the project neo-express to run the private chain quickly.
Alternatively, you can build a private chain with one node from scratch, which will be elaborated in the following sections.
Prerequisites#
Refer to Installation of NEO-CLI to install Neo-CLI. (Make sure you install the DBFTPlugin
Run Neo-CLI and enter the command
create wallet <path>to create a wallet, e.g.create wallet consensus.jsonSpecify the wallet password and confirm.
Record the wallet pubkey. This will be used in later steps.
Modifying the node configuration files#
Modifying config.json#
In config.json under the Neo-cli directory, make the following configurations:
- In
UnlockWalletspecify the wallet path and wallet password. - Set
IsActiveas true. - Set
ConsoleOutputandActiveas true. - Set
ValidatorsCountas 1. - In
StandbyCommittee, enter the public key of theconsensus.jsonwallet (Only one public key inStandbyCommitteerepresents the solo mode).
Here is an example:
{ "ApplicationConfiguration": { "Logger": { "Path": "Logs", "ConsoleOutput": true, "Active": true }, "Storage": { "Engine": "LevelDBStore", "Path": "Data_LevelDB_{0}" }, "P2P": { "Port": 21333, "WsPort": 21334 }, "UnlockWallet": { "Path": "consensus.json", "Password": "1", "IsActive": true }, "PluginURL": "https://github.com/neo-project/neo-modules/releases/download/v{1}/{0}.zip" }, "ProtocolConfiguration": { "Network": 5309138, "MillisecondsPerBlock": 15000, "MaxTraceableBlocks": 2102400, "ValidatorsCount": 1, "StandbyCommittee": [ "02ff249d06faaf0b5ba865e1531bfabe07f89aef39ab59082e3bc140be0318055d" ], "SeedList": [] }}In the config.json under the Plugins\DBFTPlugin directory make the following change:
- Set
AutoStartas true, and setNetworksame as theNetworkin config.json under the Neo-cli directory.
Here is an example:
{ "PluginConfiguration": { "RecoveryLogs": "ConsensusState", "IgnoreRecoveryLogs": false, "AutoStart": true, "Network": 5309138, "MaxBlockSize": 262144, "MaxBlockSystemFee": 900000000000 }}Starting the private chain#
note
If the node has downloaded Neo test net block files, you need to delete the Data folder before running Neo-CLI, otherwise the private chain will not be able to properly generate blocks.
To start the private chain, enter the neo-cli directory and run neo-cli.exe, or run the command line and enter dotnet neo-cli.dll. The private chain is set up successfully when it goes as shown below:
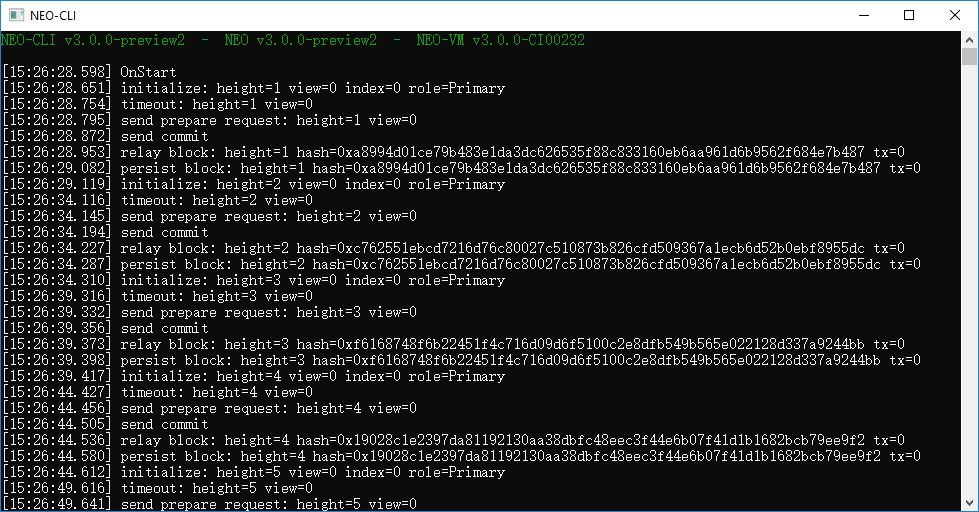
The private chain is terminated if you close the window.
Withdrawing NEO and GAS#
Using Neo-CLI to withdraw#
In the genesis block of the Neo network, 100 million NEO and 30 million GAS are generated. When the private chain is set up, you can withdraw those NEO and GAS from a multi-party address with Neo-CLI, to facilitate your blockchain development and testing.
Copy another Neo-CLI directory as an external node.
Add the consensus node tcp address (localhost:21333) to the
seedlistfield in the external node config.json.Modify the port in the external node config.json to avoid conflicting with other consensus node ports:
{ "ApplicationConfiguration": { "Logger": { "Path": "Logs", "ConsoleOutput": false, "Active": false }, "Storage": { "Engine": "LevelDBStore", "Path": "Data_LevelDB_{0}" }, "P2P": { "Port": 23333, "WsPort": 23334 }, "UnlockWallet": { "Path": "", "Password": "", "IsActive": false }, "PluginURL": "https://github.com/neo-project/neo-modules/releases/download/v{1}/{0}.zip" }, "ProtocolConfiguration": { "Network": 5309138, "MillisecondsPerBlock": 15000, "MaxTraceableBlocks": 2102400, "ValidatorsCount": 1, "StandbyCommittee": [ "02ff249d06faaf0b5ba865e1531bfabe07f89aef39ab59082e3bc140be0318055d" ], "SeedList": [ "localhost:21333" ] }}Start the private chain and the external node
From the external node command line, open the wallet consensus.json and enter
import multisigaddress m pubkeysto create a multi-part signed address, where:mis 1 as the minimal signature number andpubkeysis the public key ofconsensus.json
import multisigaddress 1 02ff249d06faaf0b5ba865e1531bfabe07f89aef39ab59082e3bc140be0318055dEnter
list asset,then you should see 100 million NEO and 30 million GAS displayed.Create a new wallet using the command
create walletand copy the wallet address.Open the wallet
consensus.jsonagain and transfer NEO and GAS to the new created wallet with thesendcommand. For example,send neo NWu2gb7PzhZb4ci9LvW4gBYAQFMGb1s1o7 100000000,send gas NWu2gb7PzhZb4ci9LvW4gBYAQFMGb1s1o7 10000000.
note
The wallet that sends tokens should have enough GAS as a few fee (usually no more than 0.02 GAS) will be charged at the time of transfer.
For more Neo-CLI commands refer to CLI command reference.