1. An Introduction:#
This article covers implementation of WalletConnect, an open source protocol for communication between dApps and wallets. With it, a user can securely sign dApp proposed transactions directly from their personal wallet without exposing their private key to the application.
Why do I need WalletConnect in my dApp?#
Almost every decentralized application needs user's authentication to send a signed transaction to the blockchain. From minting tokens to making a simple transfer, users must always sign their transactions whenever the client-side application needs to call a SmartContract method that requires the user's Account.
Without a solution like WalletConnect, the user would need to trust their private key to the dApp in order to sign. For obvious reasons, outside of testing environments, this is a huge security issue. The dApp could simply use the key to maliciously steal funds or sign something not approved by the user.
The WalletConnect 2.0 protocol:#
WalletConnect is an established chain-agnostic open source protocol for connecting decentralized applications to wallets. Whereas there are different options on how to safely implement such connection, WalletConnect is a widely supported standard across different wallets, chains and applications, and it's technical approach is simple, safe and proven.
The WalletConnect SDK:#
This article will present the usage of COZ's WalletConnect 2.0 SDK,
an auxiliary library built on top of WalletConnect which
wraps the protocol for integration within the Neo ecosystem.
And this is how it works:#
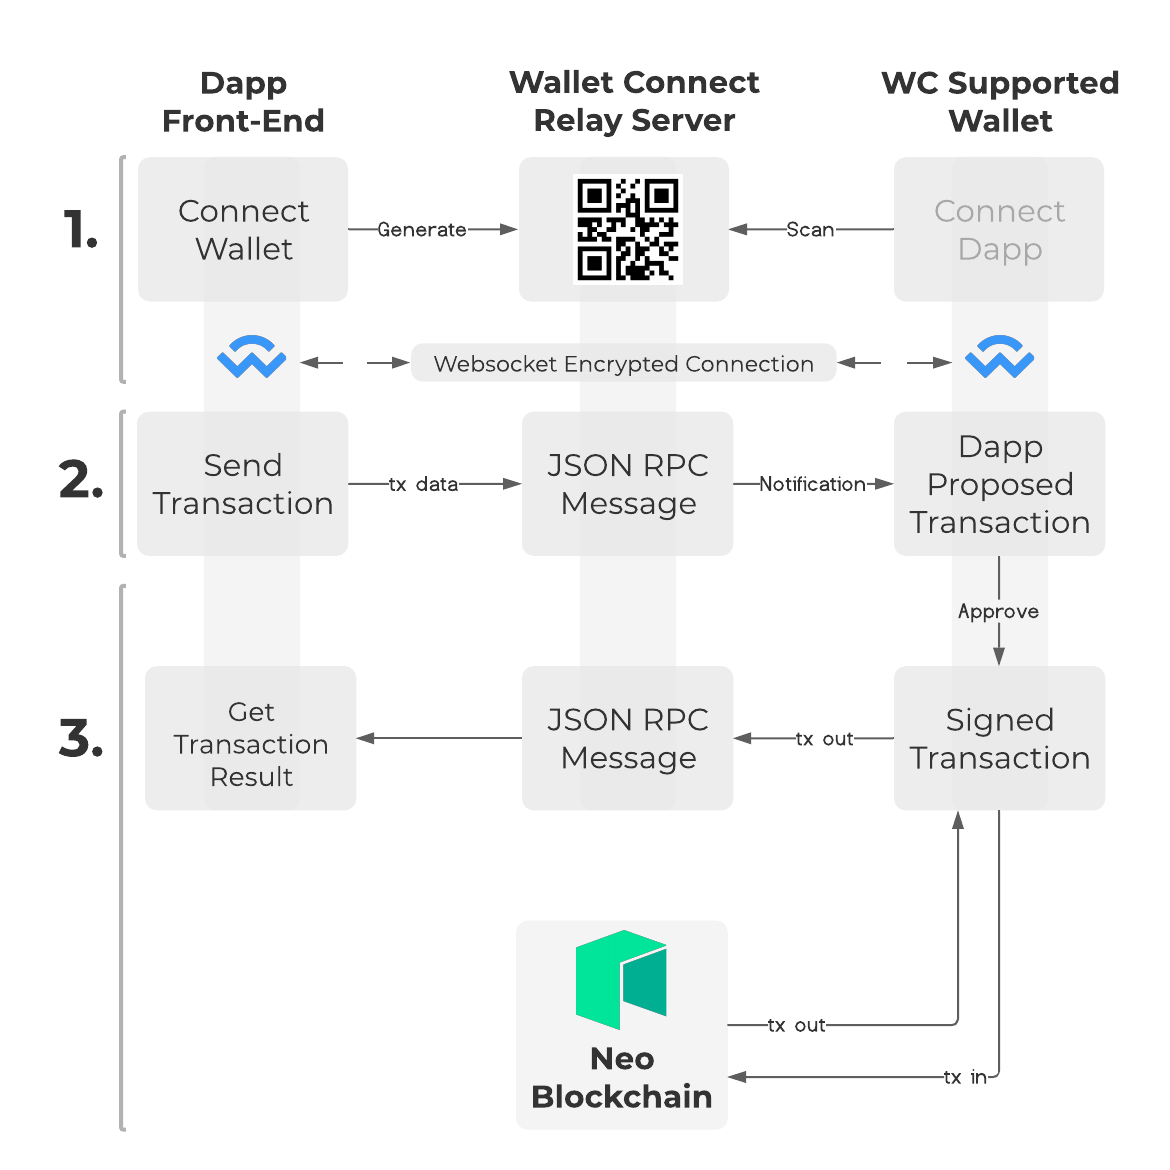
The application generates a connection payload and presents it to the user (commonly as a QR code) to provide to their wallet. The QR code contains information required to create a secure communication channel between the requesting application and wallet via a relay server.
Now, the application will have the ability to send requests directly to the user's wallet.
When a request is received, the wallet will ask for the user to approve the transaction. It will then sign the transaction, send it to the network and respond back to the dApp with the response it gets from the blockchain.
2. Using WalletConnect#
Requirements#
- A front-end application that needs to interact with smart contracts deployed to the blockchain;
- A wallet supporting N3 with WalletConnect integration. For testing purposes, we recommend the use of Neon Wallet.
- Create an account on Wallet Connect website
and then create a new
Project, it's super easy, with just a few fields on the form. After that, you will be able to get yourprojectIdand use it on your application.
Choose your path#
There are currently two packages available for COZ's WalletConnect 2.0 SDK: the Core SDK, that can be used with any front end framework, and a React SDK, a React library with a context provider that handles the state changes for us.
From here on, you will need to choose a path. Each upcoming section will briefly showcase the implementation of WalletConnect basic features using each of the packages.
2.a. The "Core" SDK#
Installation#
Install the dependency on your client-side application
NPM#
npm i @cityofzion/wallet-connect-sdk-core @walletconnect/sign-client @walletconnect/typesYARN#
yarn add @cityofzion/wallet-connect-sdk-core @walletconnect/sign-client @walletconnect/typesSetup#
Initialize the SDK with the following code:
import WcSdk from '@cityofzion/wallet-connect-sdk-core'import SignClient from '@walletconnect/sign-client'
const wcSdk = new WcSdk(await SignClient.init({ projectId: '<your wc project id>', // the ID of your project on Wallet Connect website relayUrl: 'wss://relay.walletconnect.com', // we are using walletconnect's official relay server metadata: { name: 'MyApplicationName', // your application name to be displayed on the wallet description: 'My Application description', // description to be shown on the wallet url: 'https://myapplicationdescription.app/', // url to be linked on the wallet icons: ['https://myapplicationdescription.app/myappicon.png'] // icon to be shown on the wallet }}))You only need to initialize the SDK once, so it's recommended to do it on your application's entry point.
Manage Session#
Just after initializing the client you can call manageSession, just once, it will reload the user's connected session
and subscribe to the disconnect event.
await wcSdk.manageSession()To continue the tutorial, jump to Using the SDK.
2.b The "React" SDK#
Installation#
Install the dependencies on your application
NPM#
npm i @cityofzion/wallet-connect-sdk-react @walletconnect/sign-client @walletconnect/typesYARN#
yarn add @cityofzion/wallet-connect-sdk-react @walletconnect/sign-client @walletconnect/typesSetup#
Wrap WalletConnectProvider around your App and declare the options
import {WalletConnectProvider} from "@cityofzion/wallet-connect-sdk-react";
const wcOptions = {    projectId: '<your wc project id>', // the ID of your project on Wallet Connect website    relayUrl: 'wss://relay.walletconnect.com', // we are using walletconnect's official relay server    metadata: {        name: 'MyApplicationName', // your application name to be displayed on the wallet        description: 'My Application description', // description to be shown on the wallet        url: 'https://myapplicationdescription.app/', // url to be linked on the wallet        icons: ['https://myapplicationdescription.app/myappicon.png'] // icon to be shown on the wallet    }};
ReactDOM.render( <> <WalletConnectProvider autoManageSession={true} options={wcOptions}> <App /> </WalletConnectProvider> </>, document.getElementById("root"),);Usage#
From now on, every time you need to use WalletConnect, you can simply use the useWalletConnect hook:
import {useWalletConnect} from "@cityofzion/wallet-connect-sdk-react";
export default function MyComponent() { const wcSdk = useWalletConnect() // do something}3. Using the SDK#
Check if the user is connected#
At this point, you can check if the user is connected by calling isConnected method at any moment. The following code
is optional, only to show you how to check if the user is connected.
if (wcSdk.isConnected()) { console.log(wcSdk.getAccountAddress()) // print the first connected account address console.log(wcSdk.getChainId()) // print the first connected account chain info console.log(wcSdk.session.namespaces); // print the blockchain dictionary with methods, accounts and events console.log(wcSdk.session.peer.metadata); // print the wallet metadata}But since you didn't connect yet, it will return false. So, let's connect!
Connect to the wallet#
To connect to the wallet, you need to call connect method.
First, we check if the user is already connected, if not, we call connect method.
It's important to choose the blockchain you want to connect to, and the methods you want to use.
if (!wcSdk.isConnected()) { // choose between neo3:mainnet, neo3:testnet or neo3:private, and the methods you want to use await wcSdk.connect('neo3:testnet', ['invokeFunction', 'testInvoke', 'signMessage','verifyMessage']) // and check if there is a connection console.log(wcSdk.isConnected() ? 'Connected successfully' : 'Connection refused')}The connect method will open a new browser tab to help the user to connect with its wallet. But you can handle the connection in your own way, check the documentation to see how to do it.
Disconnect from the wallet#
It's interesting to have a button to allow the user to disconnect its wallet, call disconnect when this happens:
await wcSdk.disconnect();Interacting with the Wallet using the methods#
- Use InvokeFunction to invoke a smart contract method on Neo 3 blockchain.
- Use TestInvoke to call testInvoke to retrieve information from a SmartContract without persisting any information on the blockchain.
- Use SignMessage and VerifyMessage to sign and verify messages and to be sure about the user's identity.
- Use TraverseIterator to traverse an iterator returned by a SmartContract method.
- Use GetWalletInfo to get more information about the wallet.
- Use GetNetworkVersion to get the network version used by the connected wallet.
4. Support#
If you have any trouble using the SDK, please open an issue or contact COZ at Neo's Discord Server.