0. Introduction#
This tutorial will show you how to create a fungible token using Neo3-boa, the tool to compile Python scripts into NeoVM compatible code. The token will be compliant with the NEP-17 standard.
What is the NEP-17 Standard?#
The NEP-17 standard defines a set of rules that a token contract must follow to be considered a valid fungible token on the Neo blockchain. The standard defines methods, events and callbacks that the contract must implement. The NEP-17 standard is the equivalent of the ERC-20 standard in Ethereum.
Why follow a standard?#
When a contract follows a standard, other contracts and applications can interact with it without having to know the implementation details. This allows other developers to easily create interoperable contracts and applications.
1. Prerequisites#
This tutorial assumes that you have Python 3.7 or any higher version, Visual Studio Code, the Python VS Code extension and the Neo Blockchain Toolkit VS Code extension installed and properly configured.
To properly configure Neo Blockchain Toolkit you should follow their tutorial.
2. Create a virtual environment using VS Code and install Neo3-boa#
Create a new folder for your project and open it in VS Code, then create a file named requirements.txt and write
neo3-boa==1.0.0 inside it.
Press Ctrl+Shift+P to open the Command Palette and type Python: Create Environment, select Venv, your Python
version, select the requirements.txt file, and press Ok, so that the virtual environment can be created.
Create a new terminal by pressing Ctrl+Shift+P and typing Terminal: Create New Terminal. You should see (.venv)
at the beginning of the terminal line. You'll only be able to compile your contract if the virtual environment is
active.
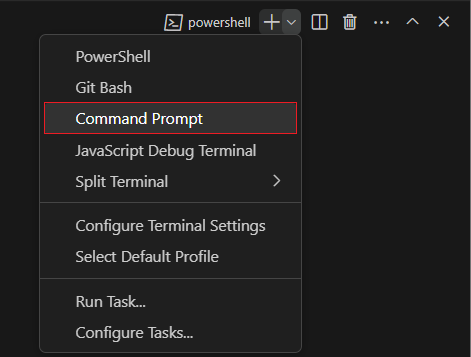
Note: if you are using a powershell terminal you might get an error stating that the
Activate.ps1 cannot be loaded because running scripts is disabled on this system, you can just use a cmd terminal instead by clicking on the ⌄ icon on right side of the + symbol on the terminal tab and selectingCommand Prompt. If everything is alright you should see(.venv)at the beginning of the terminal line.
Also, if you have a Python file open, you can check the lower right corner of VS Code to verify that the virtual environment
is active, and it's using Python 3.

3. Create the Coin contract file#
Create a new file called coin.py and add the following method to indicate that a hundred million tokens will exist in
the contract:
from boa3.builtin.compile_time import public
@public(name='totalSupply', safe=True)def total_supply() -> int: return 10 ** 84. Compiling the contract#
Open the VS Code terminal and run the following command to compile the contract:
neo3-boa compile coin.py --debugBe sure to include the --debug flag to generate the debug information required by the Neo Blockchain Toolkit.
If the compilation is successful, you should see 3 new files:
coin.nef: The contract binary file (bytecode);coin.manifest.json: The contract manifest file. This file is required to deploy the contract and is automatically generated by the compiler alongside the nef.coin.nefdbgnfo: The debug information file. This file is required by the Neo Blockchain Toolkit to debug the contract.
5. Running the contract using the Neo Blockchain Toolkit#
Click on the .nef or .manifest.json generated file and press Ctrl+Shift+D to open the Run and Debug panel.
Click on create a launch.json file and select Neo Contract as the environment.
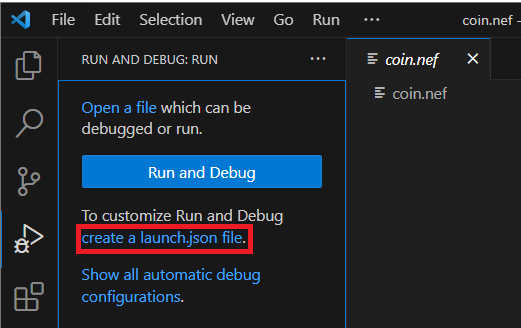
This will generate a .vscode/launch.json file inside the project folder. Open the file and replace the operation
field value with totalSupply:
..."invocation": { "operation": "totalSupply", "args": []}...Next, press F5 to start debugging. The Neo Blockchain Toolkit will simulate a contract deploy so that you can invoke the
totalSupply method in a test environment. This environment will not be persisted after the debug session ends. So, if
you want to test a method that changes the contract storage, you will need to deploy the contract to a local neo-express
instance or the testnet.
Debugging the totalSupply method will not be very useful, but it's a good way to test if your environment is working
properly. After debugging, you should get a message on the debug console showing the GAS consumed and the return value of the method.
6. Contract Initialization#
To test some methods that we will implement, having some data on the storage will be important. So we will save some information on the storage when the contract is deployed.
Neo has some methods that are automatically called by the Virtual Machine, for example, there is the _deploy method
that is called whenever a contract is deployed or updated, and is often used in all kinds of smart contracts.
_deploy#
We will be using this method to initialize the contract storage, giving all tokens to the one who deployed the smart
contract. To do so, we will be using the runtime.script_container to get the script hash of the sender.
Then, save the sender as the owner of the whole total supply on the storage with the storage.put method. Our strategy
is to have the owner as the key and the quantity of tokens they own as the value of the storage.
# update coin.py adding the following code:from typing import Anyfrom boa3.builtin.contract import Nep17TransferEventfrom boa3.builtin.interop import runtime, storagefrom boa3.builtin.interop.blockchain import Transaction

@publicdef _deploy(data: Any, update: bool):    # if the contract is being deployed for the first time, add all tokens to the contract deployer    if not update:        container: Transaction = runtime.script_container        storage.put(container.sender, total_supply())
# trigger the Transfer event to notify that the tokens were minted, it's a NEP-17 requirement # check out more about NEP-17 events here: https://github.com/neo-project/proposals/blob/master/nep-17.mediawiki#events Nep17TransferEvent(None, container.sender, total_supply())Methods that start with an underscore are not callable by the user. In this example, the _deploy method is called
automatically when the contract is deployed.
7. NEP-17 Methods#
The NEP-17 standard defines 5 mandatory methods that a token contract must implement:
symbol#
Returns the token symbol. In this example, we will return the string COIN.
# update coin.py adding the following code:
@public(safe=True)def symbol() -> str: return "COIN"When writting methods that will be used by other contracts or users, you need to use the public decorator.
The safe parameter indicates that when calling the method it won't change the contract storage and can be safely
called by other contracts or users.
If you want to run one of the new methods that will be added, you need to recompile the smart contract using
Neo3-boa again and change the operation in the .vscode/launch.json file to the name of the method you want to run.
Strings returned by the contract are shown as a hex string by default, that's why if you try to run the test by just
changing the operation to symbol, the return is 434f494e instead of COIN. But you can add the
"return-types"
configuration to cast it into a legible string.
..."invocation": { "operation": "symbol", "args": []},"return-types": [ "string",],...decimals#
Returns the number of decimals used by the token. This is used to provide decimal precision when displaying token balances because Neo doesn't support floating types as they are often unreliable. In this example, we will return 2, but in a real situation you'd want a bigger decimal number.
# update coin.py adding the following code:
@public(safe=True)def decimals() -> int: return 2totalSupply#
Returns the total supply of the token. We already implemented this method before, but, since we just defined that there will be 2 decimals, we need to multiply the supply by 10 ** 2.
# update coin.py by overwriting the total_supply method with the following code:
@public(name='totalSupply', safe=True)def total_supply() -> int: return (10 ** 8) * 10 ** decimals()The name parameter is used to define how this method will be called. Since Neo's first supported languages were C#, VB.Net, F#,
Java, and Kotlin, the naming convention of the Neo standards methods is not snake_case. However, Neo3-boa allows you to write a
more pythonic code with snake_case methods as long as you add the name parameter to the public decorator when necessary.
balanceOf#
Returns the balance of a token for a specific address. Every token should be stored and linked to an address in the
contract storage, and to access the storage we will be using the storage.get method.
In this smart contract, we made it so that the key to accessing the number of tokens an address has is just the script hash
of the address (represented by the UInt160 type).
The storage.get method returns a bytes value, so we need to convert it to an int before returning it.
# update coin.py adding the following code:from boa3.builtin.type import UInt160, helper as type_helper
@public(name='balanceOf', safe=True)def balance_of(account: UInt160) -> int:    assert len(account) == 20   # NEP-17 requires the address to be 20 bytes long
amount_in_bytes = storage.get(account) return type_helper.to_int(amount_in_bytes)To run methods that require parameters, you need to add the parameters to the args list in the .vscode/launch.json
file. For example, to run the balanceOf method, you need to add the address you want to check the balance of.
Since we didn't define a signer,
the account that will deploy the smart contract is 0x0000000000000000000000000000000000000000 and that is the
only account that will have a balance that is not zero.
..."invocation": { "operation": "balanceOf", "args": [ "0x0000000000000000000000000000000000000000" ]},...transfer#
Transfers a number of tokens from the sender to the specified address, passing an optional data parameter.
We won't be using the data parameter in this example, but it's required by the NEP-17 standard. This method has a lot of peculiarities detailed in the comments in the code below.
# update coin.py adding the following code:
from boa3.builtin.interop import blockchain, contract
@publicdef transfer(from_address: UInt160, to_address: UInt160, amount: int, data: Any) -> bool:    # NEP-17 requires the address to be 20 bytes long    assert len(from_address) == 20       assert len(to_address) == 20    # it also requires the amount to be greater than or equal to 0    assert amount >= 0
    tokens_sender = balance_of(from_address)    tokens_receiver = balance_of(to_address)
    # to transfer tokens, the sender must be authenticated.     # We will use the `check_witness` method to verify that the sender is the owner of the tokens.    if not runtime.check_witness(from_address):        return False
    if tokens_sender < amount:        return False
    # if `amount` is 0 or the sender is also the receiver, there is no need to change the storage    if amount != 0 and from_address != to_address:        # use the `storage.put` method to change the storage        storage.put(from_address, type_helper.to_bytes(tokens_sender - amount))        storage.put(to_address, type_helper.to_bytes(tokens_receiver + amount))        # if the method succeeds, it must fire the Transfer event    # check out more details here: https://github.com/neo-project/proposals/blob/master/nep-17.mediawiki#transfer-1    Nep17TransferEvent(from_address, to_address, amount)    # if the to_address is a smart contract, it must call the onNEP17Payment    if blockchain.get_contract(to_address) is not None:        contract.call_contract(to_address, 'onNEP17Payment', [from_address, amount, data])
return TrueSince the transfer method changes values on the storage, it can not be flagged as safe.
The transfer method is the most complex method of the NEP-17 standard. It's the method you should debug the most.
However, to reach the end of the function and return True, you need to pass through the check_witness function.
So, you can either add a signer
when invoking or add a runtime property
to always return True when doing a check_witness.
In the example below, we are transfering 5.00 tokens from the 0x00000... address to the 0x99999... address.
..."invocation": { "operation": "transfer", "args": [ "0x0000000000000000000000000000000000000000", "0x9999999999999999999999999999999999999999", 500, null ]},"runtime": { "witnesses": { "check-result": true }}...Since the debugger is just simulating an invocation, the changes made to the storage won't persist after the debug
session has ended. So, trying to check the balance of the 0x99999... address later will not return 500.
8. NEP-17 Callbacks#
The NEP-17 standard defines a single callback called onNEP17Payment that must be called if the recipient is a contract.
This callback is used to notify the recipient that it has received tokens. It's up to the recipient to implement this
callback. The recipient can reject the transfer by raising an exception.
# update coin.py adding the following code:from boa3.builtin.contract import abort
@public(name='onNEP17Payment')def on_nep17_payment(from_address: UInt160, amount: int, data: Any): abort() # in this example, the smart contract is rejecting all transfers made to it9. Manifest Metadata#
Neo3-boa allows you to define the contract metadata using the metadata decorator. This information is used to generate
the contract manifest file. You can check the coin.manifest.json before and after adding the method to see the changes
made into the file.
In our example, we will define the contract name and the supported standards, but you can add any information you want
to. We are also adding permissions to allow our contract to call the onNEP17Payment method. The compiler automatically
does this step, but it's a good practice to define the permissions in the contract code.
from boa3.builtin.compile_time import metadata, NeoMetadata
@metadatadef manifest_metadata() -> NeoMetadata: meta = NeoMetadata() meta.name = 'Coin Contract' meta.supported_standards = ['NEP-17'] meta.add_permission(methods=['onNEP17Payment']) return meta10. Other examples#
Check out this simple NEP-17 example to see a smart contract that is as simple as the one in this example, but is more cohesive and uses some more features in its implementation.
Also, check out this more complex NEP-17 example to examine a smart contract that can also mint and burn tokens.
11. What's next#
To test your smart contract in a more realist environment, you might want to create a private network with neo-express and deploy your smart contract into it, or deploy your smart contract into a testnet.